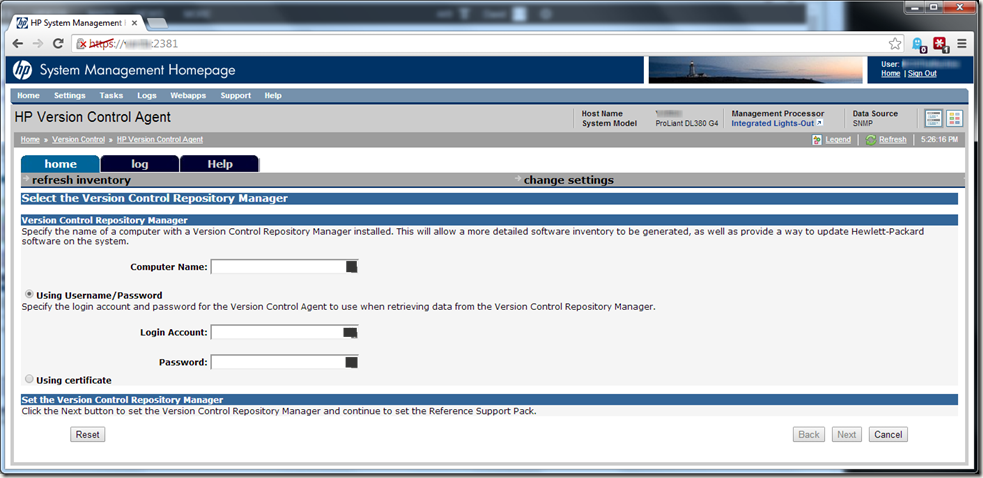
When you can’t Connect HP Version Control Agent (VCA) to the Version Control Repository Manager (VCRM).

As a self-taught Systems Administrator, I tend to learn by the process of trial and error.  And boy have I erred a lot recently.  I’ve been banging my head against this particular brick wall (not being able to connect the HP VCA to the HP VCRM) in earnest the last couple of weeks:

HP VCA Connect

It seemed that no matter how I input the info on the screen above, the two would never see each other.  Credentials were confirmed, permissions vetted, yet every time I filled out this screen and clicked “next”, I would inevitably get the message “The specified repository, servername.domainname.com, is invalid or not reachable.”. I was just going around and around, in a downward spiral that didn’t bode well for my sanity.

I was therefore EXTREMELY happy when I found this gem in the HP Systems Insight Manager Support forums in a post talking about an upgrade from version 7.2.2.0 to 7.3.0.0:

I’ve got answer form HP TS regarding HP VCA 7.2.2.0 working with HP VCRM 7.3.0.0

I did not got full answer of root cause of this issue but form provided command I suspect that it is is realted with SSL Cipher configuration.

For me these commands solved th issue.

Please try run follwing commands on server with HP VCRM 7.3.0.0:

C:\HP\hpsmh\bin>smhconfig.exe -Z ALL:!ADH:!EXPORT56:!EXPORT40:DES-CBC3-SHA:RC4-MD5:RC4-SHA:RC4+RSA:+HIGH:+MEDIUM:-SSLv2:+EXP:!LOW:!eNULL:!aNULL

C:\HP\hpsmh\bin>smhconfig.exe -r

For me these commands solved the issue.


Sadly, I wasn’t sure this would resolve my problems, since I had never been able to get VCA and VCRM to talk initially, therefore my problems obviously were not due to an upgrade like everyone else’s.  However, some of the connectivity issues mirrored those I was experiencing, so I applied the fix as a batch-file (copy/paste commands to text file to avoid fat-fingering any characters, saved as .BAT file, issued command line “run as administrator”), and voila!  Suddenly I can connect the two together!   

Sadly, I have no breakdown of the intimate details involved with what the commands do exactly, or how they accomplish the resolution, but it was made clear that the problem was due to an SSL Cipher configuration.  My take is that it appears that HP had actually removed some expected ciphers from 7.3.x.x of VCRM, which then prevented the communication from VCA Agents.

But, all good now!

How to recover your Hacked WordPress Site (Part-3)


Have you read How to recover your Hacked WordPress Site (Part-2) yet?

Stage 6: Getting back to (almost) business as usual.

The new Mindset: As mentioned above, before you are done with this clean-up process you will need to look at security in a whole new light.   Or at the very least, you had best respect the fact that your ability to keep hackers at bay rests on your ability to maintain a proper pro-security mindset.  So along those lines, let’s discuss a few quick topics pertaining to Security that you can mull over now that the immediate emergency is over.

Continue reading

How to recover your Hacked WordPress Site (Part-2)


Have you read How to recover your Hacked WordPress Site (Part-1) yet?

Stage 3: Let the Sanitizing begin.

Once you’ve identified the “vector” or angle that the hackers used to compromise your website, you can now get to work plugging the holes.  Wordfence keeps a massive Archive collection of every known WordPress Theme and Plugin.  For those legitimate configuration files that might have simply been compromised along the way, you can re-download a known-good version of the file from the Wordfence archives.  Delete the ones that don’t belong on your website.  Just keep fixing those files which are infected, and deleting those that don’t belong until your site is once again clean.  If your hacker wasn’t aware of your attempt to take back your Account and Website, they will probably begin to realize it soon.  Keep moving!

Continue reading

How to recover your Hacked WordPress Site (Part-1)

So, you think that your WP Site got hacked, what is the first thing you should do?

There are quite literally several dozen things that you should do, but each case is different.  I will try to highlight the most important points below.  The reason that there are so many steps is that there are so many different ways to approach this dilemma.  The most immediate decision for you is are you going to adopt a hands-off approach of hiring a security consultant to clean it for you, or are you going to go the DIY route like I chose to do.  Even then, there are so many different ways that people prefer to do things.  Overall, this process involves a lot of smaller steps, but there is one step to the whole process that is really big, regardless of whether you DIY or hire someone to do the cleanup.  It may be the single most important aspect of this entire process: and that is changing your mindset on about how you approach security.  And that folks, is a massive undertaking, because changing the way your mind operates may also be the single hardest step in this entire how-to guide.

The following are all recommendations on my part, suggestions that you need to discard or accept, but in my opinion they make up a fairly logical progression on how to deal with such issues should you ever find yourself in this situation.   You can of course choose to perform these steps in a different order, but I believe that they will be most effective in the order I present them.  I hope they will at least be a helpful aid to you in your time of need, allowing you to recover as much of your website as is possible.   Cleaning any hack is going to take some time and effort, so you really need to think about whether you want to tackle this on your own.   In the end, I think you’ll be happy that you chose to do it yourself.  As with any such DIY process, you assume all risk and responsibility for any and all actions and outcomes, and obviously your mileage may vary.  No matter which direction you decide to go, I’ll wish you the very best of luck in your cleaning endeavors!

Continue reading

Seen a .menc file before?

If you’ve ever seen a .menc file before, you probably saw it on an external memory card that you pulled out of your Windows Phone device.  

Essentially, .menc (Mobile Encryption) files are just your personal data (the PIM.VOL file that contains all of your Contacts for example) that are encrypted.  The extension of .menc lets the Operating System (OS) know which files are encrypted, and whether or not they can be opened by the user.   To do so, the previously recorded key (user password) must match the key provided by the user when unlocking the device.  But you won’t see those .menc files, because they are typically hidden by the OS so as not to be visible to the end-user during casual browsing.   If you ever chose to encrypt the files you store on your external storage (external memory card, etc), then they may be visible if you took that card to another computer or device for viewing.

If you’re trying to recover those files, then you have to meet some rather special requirements in order to proceed.  Unfortunately, if you have Hard Reset the device, or have a different device than the one that the files were originally created on, then the encryption/decryption keys are now lost or no longer the same, then sadly your files are totally inaccessible. 

However, if you have access to the same device that the .menc files were originally created on, and you have NOT performed a Hard Reset on the device, then you can still salvage the files:

  1. Turn the storage card encryption off: Go to Start > Settings > System > Encryption (varies by your Operating System version) and uncheck the “Encrypt files when placed on a storage card” box. From this point forward, all NEW files created on that card will be unencrypted, but existing files will still be encrypted.
  2. Next, bring-up your favorite File Explorer, then browse to your Storage Card. Make a new folder on the storage card, and call it “OLDData”.  This folder will, of course, be unencrypted.
  3. Now, find whatever files you want to decrypt and copy them into this folder.  Those files will be decypted as they copy into the new folder.  You can now read these files on any other computer or phone.

Congratulations, you’ve just saved some data.   Hopefully it will turn out to be highly important data, which will make your victory taste just a little bit sweeter…

"Wi-Fi Companion" as a Troubleshooting Utility

"Wi-Fi Companion" will assist those who would assist you, as well as your fellow users in helping you isolate the cause of most Wireless WiFi problems.

Once you have it installed, please unplug your iPAQ’s battery for 30seconds, then replace it. This will cause a core-reset of the wireless adapter, and force a Soft Reset on the iPAQ itself. No data is lost on a Soft-Reset.

Once you have turned on your iPAQ and have re-enabled your wireless adapter, and are within "Wi-Fi Companion", please go to the Router Tower icon in the lower right-hand corner and create a profile for your home Router connection. Check the OK button and return to the main view. When your iPAQ has "associated" with the Router/AP (a period wherein the two units are negotiating your iPAQ’s IP Address assignment), you will see a lightning-bolt connecting the two units.

After this, assuming your profile is correct, you should see your iPAQ obtain a valid IP Address (which is defined as something other than an IP Address of 169.254.n.n). Please press and hold on the PDA icon in the upper left-hand corner and pick IP Addresses, and please report back to us what the various settings are:

IP Address:
Subnet Mask:
Gateway:
DNS Server:
WINS Server:
DHCP Server:
Domain Name:
Lease Obtained:
Lease Expires:
MAC Address:
Device Name:

Additionally, on the main "Wi-Fi Companion" screen, please advise of the following settings:

1.) Do you see the name of the Wireless LAN you wish to connect to? If not, click on the Router tower icon to go to the "Wi-Fi Finder" screen and build a profile specific to the Router/AP you wish to connect to. Click OK to return to the main screen.
2.) When the iPAQ is associated with the Router/AP, is there a key & lock icon on the upper half of the lightning bolt going towards the PDA icon?
3.) What is the signal strength (100%? 60%?).
4.) Does this signal strength get better the closer you get to the Router?
5.) What is the channel assignment shown to the lower right of the Tower icon (in a black circle).
6.) Go back to the "Wi-Fi Finder" screen. What is the mode that "Wi-Fi Companion" is detecting (shown on the upper-right corner of the profile)?
7.) Do you have WEP enabled on the Router? If you do, please Disable it for now.
8.) Do you have MAC Address Filtering enabled? If you do, please Disable it for now.

Anatomy of the DHCP assignment process

I.) There are two ways to configure your Network connection.

1.) The first (due to it being a "default" setting for most network adapters) and best way to configure your network connection is to enable a process called DHCP (for "Dynamic Host Configuration Protocol"), also referred to as a "Dynamic IP Assignment", because the DHCP server can change assignments on an "as needed" basis.

2.) The second way it to manually specify your settings, also referred to as a "Static IP Assignment", because the system will forever keep your manual assignment until you tell it otherwise.

Continue reading

How to setup an E-mail Account on your PDA

Before we begin, you will need to collect the following information. Most of it will come from your ISP or account provider, some of them are personal choices:
1.) Your username.
2.) Your provider’s server info. This will be in the form of pop.isp.com and smtp.isp.com
3.) You will need to know what connection type you are using (“work” or “the internet“). More on this setting here.
4.) Here’s a very important page: Most e-mail servers now-a-days require an outgoing mail authentication. You will need to confirm with your provider if this is required or not.
5.) Decide whether or not you want to choose “Get message headers only”, or “Get full copy of message”.
  • Headers only means that the e-mail header info (to, from, and subject line) is downloaded first. You must then chose those e-mails which interest you and then manually download the body of the message as a separate step. This is a better choice if you get tons of mail and lots of spam, and only intend on reading certain messages.
  • Full copy is getting the whole message in one fell swoop. This is appropriate if you are expecting to read every e-mail you receive and have very little spam.

Continue reading

The Different WiFi Authentication & Encryption Standards

WEP:
The 40-bit and 64-bit Question:
Wired Equivalent Privacy uses a streaming cipher, which combines the use of a 40-bit WEP Key with a 24-bit random number (known as the Initialization Vector, or IV ) generated by the Router/AP to encrypt the data. You can think of the IV as simply a header for the key. So, for a 64-bit Cipher, the user actually contributes a key length is 40-bits (5 bytes or 10HEX characters), with an additional 24-bits (3 bytes) of system-generated data, for a total of 64-bits (8 bytes) total.

* If you are entering your Key in HEX format, your Key should be 10 HEX characters long.

Continue reading

Troubleshooting WEP Problems

When having problems with WEP:

1.) Determine what your cipher length is going to be. For the purposes of troubleshooting, it is suggested that you start with a 64bit encryption.

However, the Router will usually make a contribution to the actual key length, so this will impact what your contribution is. Before proceding any further, please review your Router Documentation to see if your Router contributes to the key-length. If key-length for a 64bit key is expected to be 8 characters, then your Router is NOT contributing any overhead information to the key. The remainder of this article will presume your Router inserts it’s own 3 bytes of data.


Continue reading