Got my new 2.5″ SAS drives for the server

I had placed an order a week ago for the new 2.5″ 1TB SAS drives, and today they arrived.   So looking forward to plugging these drives in and getting some larger storage pool going for the server.

As mentioned in my September posting, I’ve only just recently realized that the hardware RAID card that came with the Dell PowerEdge R610 was less useful in today’s homelab.

So, I’ll need to source a new HBA (Host Bus Adapter) card in order to leverage ZFS, but everything I’ve read since shows that I should be good to order an HBA with IT (Initiator Target) Mode and the drives I’ve selected will then automatically pass-thru to TrueNAS and be capable of using software RAID-Z.

The drives I can slot immediately, but will I play with the PERC 6/i and use a hardware-based RAID for the time being?  I don’t know.  It seems I bought these last two components in the wrong order…

SSH Error “Unprotected Private Key file” in Windows

So today I copied my private key file to a different Windows desktop machine that I use frequently, but got this error when trying to initiate a new SSH session from that desktop:

I know this should work on any number of different machines.   PUB Key goes into any Server, and the PRIV Key goes into any client machine you’ll be using to access those servers.  And my PUB Key worked fine on several different Servers, so this proves that both files themselves were fine, so the trouble had to be some kind of permission aspect.

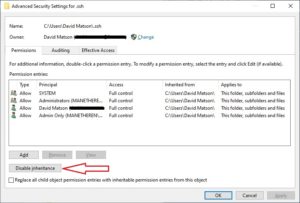
The main error is “Unprotected Private Key”, but there was a secondary warning about how the file was “too open”.  What this means is that there are too many people, groups, or teams who have access to the file.  This supports the theory that it was a permission issue.   What I did to resolve this issue is to:

  • Locate the newly copied-over file in the SSH directory (under Users\YourUsername\.ssh), right-click on it, and pick Properties.
  • Then, click on the Security tab, then the Advanced button towards the bottom to get this screen:

  • Now, disable inherited permissions by clicking on the Disable Inherited > Convert inherited permissions
  • Now, try running your SSH command again to see if this remedied the issue.  If it didn’t, we’ll take the next step.
  • Back at the above screen, make sure your intended profile is listed as OWNER at the top.  If not, click Change and make it the appropriate username.  Try SSH again.
  • If this again doesn’t fix the issue, then go to the middle section and remove unnecessary users, one by one, until you can SSH into your box successfully.

As for myself, I only needed to disable inherited permissions.

I hope this works to assist you further in your Mobile World!


Today I Hardened some of my Servers

I have been slowly getting to know Linux commands on the Command Line Interface (CLI) over the last few months.  And today was truly a great day, as I got to “harden” some of my servers by following these steps:

  1. Turn-on Automatic Updates
  2. Add a new limited (non-root) user
  3. Setup SSH Key-pairs
  4. Modify /etc/ssh/sshd_config to
    1. lockout all passwords
    2. change to only recognize IPv4
    3. change the default SSH port
  5. Add a Firewall

I won’t be able to follow all of these steps for all Servers, because some of them require Root for other installed packages/software (like Proxmox, etc) to continue working, but I’m endeavoring to at least get all of my servers completed up to Step-3.  So, progress!

Some Updates on my future NAS project

A lot of the research I’ve been doing lately has revealed that most NAS Server Admin’s today are not using a Hardware RAID controller anymore.

Instead, they are using a Host Bus Adapter (HBA) in place of the dedicated Hardware RAID Controller Card.  This allows them to leverage their Server’s CPU to provide the computational power for a Software RAID, using a new Advanced File System called ZFS.  ZFS of course has it’s own version of RAID called RAID-Z.   I intend to use this for my main storage going forward, but I’ll have to order some new stuff, like the afore-mentioned HBA card to replace my PERC 6/i, as well as some new cables to feed the backplane as the old PERC 6/i used a different connector.


Also just added pfSense Router and Firewall to Proxmox

I actually added this to my Proxmox Server a couple of weeks ago, but today I finally changed the IP addresses of my ASUS RT-AC5300 primary Router to make my pfSense Router the primary Router at 192.168.1.1.  Then I demoted the ASUS role from Router to Access Point, and now pfSense is running the show!

Proxmox is now installed on new Server

It took a while for my SSD to be delivered, but today I was able to install Proxmox on the Dell PowerEdge Server!    Some of my future projects for VMs or Containers:

  • Pihole Recursive DNS Server
  • pfSense Firewall / Router
  • FreeNAS
  • Change hosting from ISP to self-hosting Websites
  • Add PLEX Server
  • Docker/Rancher/Kubernetes
  • Blue Iris for Surveillence Camera System
  • NextCloud for personal Cloud Service.


Pricing on SAS 2.5″ TB Drives is crazy expensive!

The one part that I neglected to fully research properly when I bought the Dell PowerEdge R610 Server was the pricing of the SAS 2.5 inch drives.   So of course that’s going to be the part that comes back to bite me in the ass.    And today, it did!

Today I found out the pricing on 2.5 inch SAS drives is crazy expensive the higher the capacity you try to go!  I had originally planned on sourcing some 2TB drives, as those are the highest capacity available for my existing PERC (PowerEdge RAID Controller) 6/i, but those are $180 to $220 each!   So I’ll need to research that further and see what my options are…

In the meantime, I’ve already found at least one solid option to help get this server off the ground!

A workaround that I can use is to pull the optical drive and hookup a 2.5 inch SSD to the cable instead.  The system will recognize this as a boot drive and I can load Proxmox onto that.   I’ll still need to get some drives for the backplane, but this will buy me some breathing room so I can take my time to find a good deal somewhere.

Bought a new (to me) Dell PowerEdge R610 Server!

I just recently bought a new (to me) Dell PowerEdge R610 Server from my Green Recycling provider of choice: eWasteGurus in Sacramento.  I purchased it with the dual Xeon x5670 CPU package, and 64Gb of ECC Memory!  Sweet!

No Hard drives though, so I’ll need to source those on my own, which is no big deal.

This ought to keep me busy in the coming weeks and months as I build out my future ProxMox Virtual Environment Server, along with its VMs and Containers. Woot! So incredibly excited to start down this path!

Use Authy for 2 Factor Authentication (2FA)

Two-factor authentication (2FA) is one of the best ways for a consumer to secure account access on pretty much any platform. Accordingly, if 2FA or MFA (Multi-Factor Authentication) is offered on any platform that you currently use, then I strongly recommend that you take advantage of it.

When logging into any platform, your 1st “factor” is your password for that account.  For example, if you’ve set up SMS Authentication, email authentication, or use an Authentication App, then the code/link in your SMS/email/App is the 2nd factor, thus the “two-factor” in 2FA. That single EXTRA piece of information alongside your account password goes a long way in helping to secure your account.  Some would argue that SMS and E-mail 2FA are bad because they are more readily bypassed by Hackers.  This is a TRUE statement, however, in my book, any type of additional “factor” for authentication is a good thing, so even SMS and E-mail is better than nothing!
Continue reading